 Creative Gift Wrap Items Needed
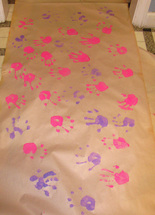
* Paint - as many colors as you want * Brown or white craft paper (large or on a roll) * Paper plate or tin * Cheap sponges (optional but recommended) I read about this idea of using a child's hand prints to make unique wrapping paper years ago and finally got around to trying it with my 4-year-old daughter. Depending on how busy your holidays will be and how far behind you are - and how patient you and your child are - you might want to try this for a few key gifts or attempt it for another occasion. But we were brave and had some time, so my daughter and I tried it. I took a big roll of the craft paper and rolled it out onto the kitchen floor. You can do Christmas colors if you want but my daughter loves pink and purple so that's what we did. I took pink paint and poured it into a paper plate and then took a cheap sponge and dipped it into the paint and wiped off the excess. Then my daughter placed her hand on the wet sponge before placing it on the paper. You can have your child dip their hand directly into the paint but I find that this means more paint on the hands and potentially sloppier prints. She did pink all around the paper with one hand and then we washed her hand. Then I poured purple paint onto another plate and used another sponge. Then my daughter used her other hand and repeated the process. I don't know whether it was the type of paint (the pink was tempera and the purple was acrylic) or she got lazier over time but I thought the pink hand prints came out better. If it was the paint, then you might want to try tempera. This is a messy craft, but fun. Also, find a place you can easily clean whether it's putting a tarp down or using a linoleum floor like ours. I also recommend you and your child wear old clothes or depending on the child's age, have them wear only a diaper or underwear to minimize clothes clean up. You also can do foot prints as a change of pace and if you have multiple children this is a neat way to showcase the different sizes. I think this is a creative and unique way to wrap gifts, especially for grandparents, which is how we plan to use the paper. And they can even save some of the paper if they want. If your child is really young and you want to do this, I'd recommend taking one hand print impression (and an ink pad might be better) and scanning it into your computer. Then just copy and paste it in a word document and print. This method would work best with smaller gifts.
0 Comments
 Items Needed:
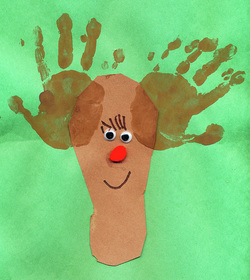
* Two pieces of construction or copy paper of different colors. One should be brown. The other, for the background, can be any color * Paint - brown was used here but any color is fine * One small pom pom * Craft glue . * Paper plate or tray (sponge optional) * Googly eyes * Black marker * A pencil * Scissors This gift was made by my preschooler at the Middlesex Recreation Department's Pre-K art class for the Christmas holiday and I think this would make a great keepsake gift for the grandparents or other relatives. You could probably do this with an older toddler but it could take a few tries to get the hands right. Take your brown piece of paper and have your child place his foot on it and use your pencil to trace around it. Cut out the traced foot (an older child can do this; otherwise the parent should). Glue the foot tracing to the background paper. Put paint on your paper plate or tray. You can have your child place their hand directly into the paint or use the sponge, which I think is easier. You can use the sponge one of two ways: dip the sponge into the paint, wiping off the excess, and have your child firmly press their hand into the sponge or use the sponge to wipe the paint onto their hands. Once the paint is on their hands, help them place each hand on the paper to make the antlers. I strongly recommend you do one hand at a time. You can do the facial features before the antlers so your last step is clean up, but I think the hand placement could determine where the eyes, etc go so I chose to do it first. If you do the hands first, you'll want to take a minute to clean their hands and then glue the eyes and the nose. Depending on the age of the child, they can draw eyelashes and a smile or the parent can do it. Sign your artist's name (or they can do it) and you have a wonderful crafty holiday gift. 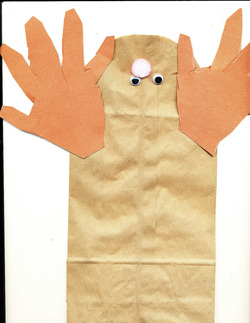 Items Needed
* Brown paper lunch bag * Brown construction paper * A medium pom pom * Googly eyes * Scissors * Pen or pencil * Craft Glue Optional: Oatmeal, glitter and plastic sandwich bag for "reindeer food" A very easy holiday craft to do with your child and it can also be a keepsake or gift bag. Cut the open end of the lunch bag so that it is rounded. Use your pen or pencil to trace your child's hands on the construction paper and then cut them out. Glue the hands to your bag to make the antlers. Then glue the eyes and the nose. You can choose any color pom pom for the nose; my daughter chose pink because it's her favorite color. You can use the bag as a special gift bag, perhaps for your child to give to a friend or family member. As an option, you and your child can make the reindeer food by mixing oatmeal and glitter together in a sandwich bag and then keep it in your reindeer bag until Christmas Eve. Then sprinkle the reindeer food on your lawn on Christmas Eve night. 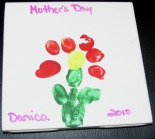 Items Needed:
* Ceramic tile * Felt (or felt circles) * Glue * Permanent Markers or acrylic paints & paint brush * Spray sealer (optional item; parents should do this part) This idea was inspired by a gift my 4-year-old daughter made for Mother's Day at the Middlesex Presbyterian Preschool, but it can make a crafty Father's Day gift as well. The artwork on the ceramic tile will depend a lot on your child's age, ability and imagination. For a baby or toddler (or older child with a hand small enough), you can apply paint to his or her hand and then stick the hand on the tile. Not only is this a cute gift, but it will be a nice memento of your child's handprint. For a crafty toddler or preschooler, you can help them make a simple design using their fingers and paint. One example is the one my daughter made, using her fingerprints to make a flower with a stem and leaves. If needed, you can help guide your child's hand. Or let your child use different colors and his fingers to make a more abstract piece. (Note: you can use a paintbrush to apply the paint to your child's finger or have them dip it into paint and wipe a little off before touching the coaster). Older children can use permanent markers or a brush to paint a picture on the tile. Mom or the child can put their name and date (if there's room) on the front or Happy Father's Day to finish off the design. Once the piece is finished, let it dry completely. Mom or another adult should take the tile to a well-ventilated area or outside and use the spray sealer on the front of the tile to seal the artwork. Make sure to use a clear sealer (matte or gloss, depending on your preference) that is designed for ceramic. Once the sealant is dry, then cut four felt circles or squares and glue them on the back of the tile on each corner. This way, the tile can be used as a coaster without scratching a tabletop. The felt step is good if you want this craft to be a coaster that can be used. If you just want the tile to be a piece of art, you can skip this step. Supply note: You can find ceramic tile kits (usually a tile with some markers or paint and about $1 or $2) at the major craft stores. You also could pick up plain or colored ceramic tiles at a home-improvement store. If you're not all "crafted out" you and your child can make a crafty card to go with it. |
Categories
All
Archives
March 2018
AuthorSandra K. Lee is a freelance writer and stay-at-home mom with a 8-year-old princess & a 4-year-old superhero in Middlesex County, New Jersey.
|

 RSS Feed
